GNU Gatekeeper & Asterisk Integration.

How to install gnu gatekeeper on Ubuntu and how to configure with asterisk servers step by step .
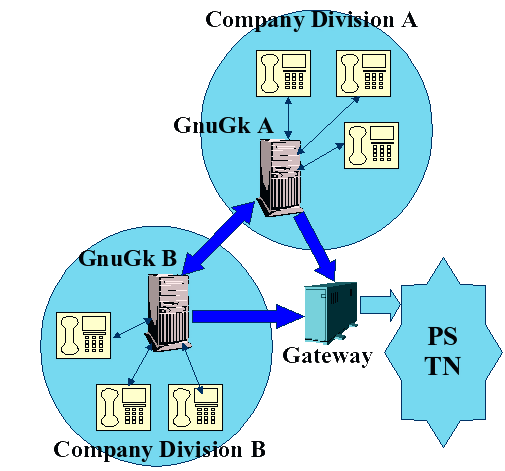
GNU Gatekeeper (GnuGk) is a popular open-source H.323 gatekeeper that can be used to manage H.323-based VoIP communication. It allows you to control access to your VoIP network and handle call routing between H.323 endpoints. Integrating it with Asterisk servers can be beneficial in managing and securing your VoIP network.
Please note that software versions might have changed since my last update, so always check for the latest versions and documentation. Additionally, make sure you have administrative privileges to install packages and modify system configurations.
Here’s a step-by-step guide to installing GnuGk and configuring it with Asterisk on Ubuntu:
Step 1: Update Ubuntu Ensure your system is up-to-date by running the following commands:
bashCopy codesudo apt update
sudo apt upgrade
Step 2: Install required packages Install the necessary packages to build GnuGk and other dependencies:
bashCopy codesudo apt install build-essential libncurses5-dev libreadline-dev libpt2.10.11-plugins-alsa libpt2.10.11-plugins-v4l2 libpt2.10.11-plugins-avc
Step 3: Download and compile GnuGk Download the GnuGk source code, extract it, compile, and install:
bashCopy codewget https://www.gnugk.org/gnugk-5.7.tar.gz
tar -xzf gnugk-5.7.tar.gz
cd gnugk-5.7
./configure
make
sudo make install
Step 4: Create the GnuGk configuration file Create the main configuration file for GnuGk. You can use the sample configuration provided and modify it to suit your needs:
bashCopy codecd /usr/local/etc
sudo cp gnugk.ini.sample gnugk.ini
sudo nano gnugk.ini
Edit the gnugk.ini file with your preferred text editor (e.g., nano, vim) to set up your configuration. Refer to GnuGk’s documentation for detailed explanations of the available options and their configurations.
Step 5: Start GnuGk After configuring GnuGk, you can start the service:
bashCopy codesudo gnugk
Step 6: Configure Asterisk To integrate Asterisk with GnuGk, you need to modify Asterisk’s configuration file, sip.conf, to register with the gatekeeper.
bashCopy codesudo nano /etc/asterisk/sip.conf
Add the following lines at the beginning of the sip.conf file:
makefileCopy code[general]
register => gatekeeper_username:gatekeeper_password@your_gatekeeper_ip
[example]
type=friend host=dynamic context=default secret=your_secret disallow=all allow=ulaw
Replace the placeholders:
gatekeeper_username: The username you set in your GnuGk configuration for Asterisk registration.gatekeeper_password: The password you set in your GnuGk configuration for Asterisk registration.your_gatekeeper_ip: The IP address of your GnuGk server.your_secret: A secret password for the connection between Asterisk and GnuGk.
Step 7: Restart Asterisk After making the changes to sip.conf, restart Asterisk to apply the new configuration:
bashCopy codesudo systemctl restart asterisk
Step 8: Test the setup Ensure GnuGk and Asterisk are running without errors. You can check GnuGk’s logs in /usr/local/log/gnugk.log, and Asterisk’s logs in /var/log/asterisk/full.
Test the communication between your H.323 endpoints through the GnuGk gatekeeper and Asterisk.
Keep in mind that VoIP and network security are essential considerations. Properly configure firewalls, access controls, and authentication mechanisms to protect your network and devices.
Please remember to refer to the official documentation of GnuGk and Asterisk for any recent changes or updates.