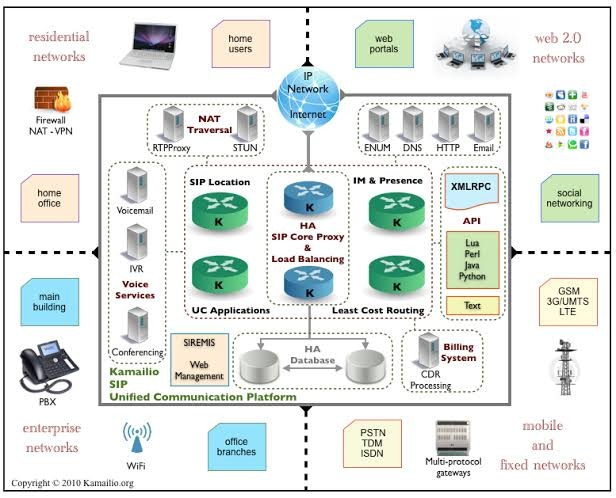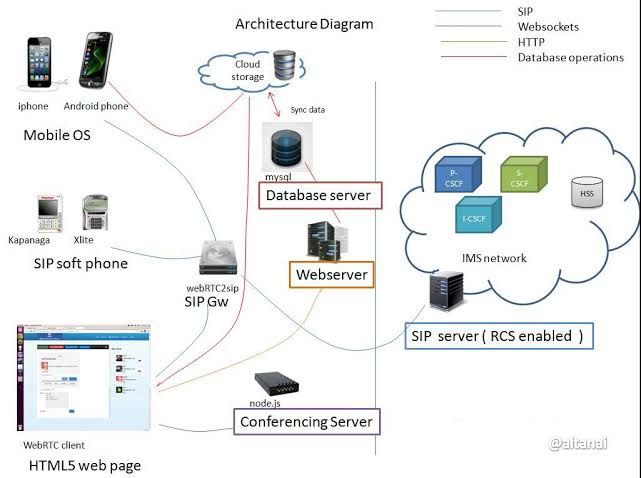
Working kamailio with Multiple Asterisk server as a Media servers Including dispatcher & Registrar module
This is a example configuration script of kamailio for load balance of multiple asterisk servers.
Working example of kamailio with load balancing July 2023..
Thanks team to reach kamailio support.
################################################################################################# In asterisk 1 entriy need to enable for reail time sync with kamailio.
/etc/asterisk/sip.con
uncomment the below line.
rtcachefriends=yes
change the below line or name on 2nd media and 3rd media server names.
realm=asterisk22.localdomain ; Realm for digest authentication ##################################################################################################
How To: Increasing VoIP Services Capacity Using Kamailio & RTPproxy
This is the second part on increasing voip services capacity. In the previous post I had a high level overview of what an SBC is and how to radically increase the call-capacity. In this post we’ll proceed with the architecture setup and configurational steps required.
The very first thing anyone requires is servers, either on VMware or physical. One server is required for kamailio and RTPproxy while at least two servers for asterisk (media-servers). We require at-least two servers to test our Load-Balancer and Fail-over scenarios else one server for media is enough to verify the call-media related tests.
So Install a Ubuntu Server and then follow this blog post to install Kamailio and integrate with Asterisk servers.
Make sure we’ve two interfaces on the SBC server for a setup like below:
Since we have a NAT environment for SIP Servers so don’t forget to define NAT settings in kamailio configuration file. This is how we can invoke NAT settings in the configuration file.
*** To enable nat traversal execute:
– define WITH_NAT
So, Just write this line on the very top of the configuration file:
#!define WITH_NAT
So, the top few lines of kamailio.cfg look like this.
#!KAMAILIO
#!define WITH_MYSQL #!define WITH_AUTH #!define WITH_USRLOCDB #!define WITH_ASTERISK #!define WITH_NAT
As soon as we’ve more than one interface on our Kamailio SBC we need to explicitly tell kamailio that we are now multi-homed. Add this in kamailio.cfg as well
mhomed=1
Above blog post is about setting up kamailio/RTPproxy and integration with asterisk realtime sipusers table for authentication purposes. For load-balancing and Fail-over we require to load “dispatcher module” in Kamailio.
Following line needs to be added in the kamailio configuration file.
loadmodule “dispatcher.so”
Following parameters need to be in place for the above module.
——- Load-balancer params ——
modparam(“dispatcher”, “db_url”,”mysql://openser:openserrw@localhost/openser”) modparam(“dispatcher”, “table_name”, “dispatcher”) modparam(“dispatcher”, “setid_col”, “setid”) modparam(“dispatcher”, “destination_col”, “destination”) modparam(“dispatcher”, “force_dst”, 1) modparam(“dispatcher”, “flags”, 3) modparam(“dispatcher”, “dst_avp”, “$avp(i:271)”) modparam(“dispatcher”, “cnt_avp”, “$avp(i:273)”) modparam(“dispatcher”, “ds_ping_from”, “sip:proxy@10.1.1.1”) modparam(“dispatcher”, “ds_ping_interval”,15) modparam(“dispatcher”, “ds_probing_mode”, 1) modparam(“dispatcher”, “ds_ping_reply_codes”, “class=2;code=403;code=404;code=484;class=3”)
I’ve highlighted code=403;code=404 above. these are important since asterisks’ reply with SIP 404 Not Found or SIP 484 if no peer information is provided in sip.conf. Adding the lines mentioned below in asterisk’s sip.conf will allow the Kamailio SBC
[Kam-SBC] type=friend host=10.1.1.1 port=5060 disallow=all allow=gsm allow=g729 allow=alaw allow=ulaw context=SBC-Incoming canreinvite=no insecure=port,invite dtmfmode=rfc2833 nat=yes qualify=yes Doing a “sip reload” in asterisk CLI should result ina notice like below:
chan_sip.c:19842 handle_response_peerpoke: Peer ‘Kam-SBC’ is now Reachable. (2ms / 2000ms)
Up-till now one should’ve SIP users successfully REGISTER on SBC using asterisk-sip realtime table. Also we’ve load-balancer module setup in SBC.Now add Media-Servers in the dispatcher module in the openser DB.
log into mysql,
mysql -uopenser -popenserrw openser
INSERT INTO dispatcher (setid,destination,flags,priority,attrs,description) VALUES (1,”sip:10.1.1.3:5060″,0,0,”weight=50″,”Asteriskl-I”),(1,”sip:10.1.1.4:5060″,0,0,”weight=50″,”Asteriskl-II”);
Next we need to restart kamailio to activate all the configuration changes. Changes in Dispatcher table can be made effective using the mi-fifo command.
#kamctl dispatcher reload
Status of the Media-Servers can be viewed in realtime using mi-fifo command on linux shell. #kamctl dispatcher dump
[UPDATE] Forwarding Calls to Asterisk Servers
Now, in our kamailio.cfg file we need to send the calls to the Asterisk server IPs which we just loaded in dispatcher table.
Find this code in configuration:
Send to Asterisk
route[TOASTERISK] { $du = “sip:” + $sel(cfg_get.asterisk.bindip) + “:”
- $sel(cfg_get.asterisk.bindport); route(RELAY); exit; }
Now, we see that we’re hard-coding the $du, destination URI to use just one IP which we need to change to select some Load-balanced available Asterisk server’s IP:PORT and route to.
Update the above code to something like this:
Send to Asterisk
route[TOASTERISK] { ds_mark_dst(“P”); if(!ds_select_dst(“1”, “4”)) { sl_send_reply(“500”, “Service Unavailable”); xlog(“L_INFO”,”[$fU@$si:$sp]{$rm} No destinations available for $rd \n”); exit; }
    xlog("L_INFO","[$fU@$si:$sp]{$rm} From Outside World to Asterisk Box $du\n");
    rtpproxy_manage("cawei");
route(RELAY); exit; }
Similarly we need to detect if calls are coming in FROM Asterisk Boxes so in route FROMASTERISK put in some modifications to detect if call is coming from our own Asterisk servers.
Find the following code:
Test if coming from Asterisk
route[FROMASTERISK] { if($si==$sel(cfg_get.asterisk.bindip) && $sp==$sel(cfg_get.asterisk.bindport)) return 1; return -1; }
And Modify it to something like this:
Test if coming from Asterisk
route[FROMASTERISK] { if(ds_is_from_list()){ rtpproxy_manage(“cawie”); xlog(“L_INFO”,”[$fU@$si:$sp]{$rm} Call from Media-Server Cluster\n”); return 1; } return -1; }
With those above changes I believe a complete call-in , call-out scenario should be covered.
P.S: Do come back with your issues while following this tutorial and I will update it with fixes or your suggestions to help other people trying to go through this stage.
Special Considerations for RTPproxy
We need to engage RTPproxy for all inbound and outbound calls in Bridged mode. To start rtpproxy in bridged mode
#/usr/sbin/rtpproxy -F -s udp:127.0.0.1:7722 -l PU.BL.IC.IP/10.1.1.1 -d DBUG:LOG_LOCAL0
For all the incoming calls from Public Interface and terminating at Private-IP media-server we need to rtpproxy_manage() with “IE” flags like,rtpproxy_manage(“ie”)
For all outbound calls originating from Private IP media-server to some external destination should be using “EI” flags like, rtpproxy_manage(“ei”)
All of this will be done in RTPPROXY route. Just figure out the direction of the call and use the above mentioned flags and all the calls will have both-way media just like this diagram.
Ideal Signalling & Media flow.
If we don’t use the IE/EI flags appropriately then we may end up in a call flow something like this.
Invalid Destinations for RTP/Media Tips: 1 -Use xlog() alot, This was my very first attempt on kamailio and I traced the whole configuration flow using the xlog() command and syslogs i.e.
xlog(“L_NOTICE”,”$rm from $fu (IP:$si:$sp) Main Route before —NAT—\n”);
xlog(“L_NOTICE”,”$rm from $fu (IP:$si:$sp) in Route[NAT] fix_nat-register\n”); xlog(“L_NOTICE”,”$rm from $fu (IP:$si:$sp) in route[RTPPROXY] RTPproxy with EI Flags\n”);
2 -Get help from User’s mailing list, don’t expect an email with fully functional error-free configuration from there rather just hints and directions to look for problem solution.
3 -Read the module documentations.
4 -Use Wireshark as much as possible to look for packet flow. This will help you understand what’s going on with the packets.
Physical-Dev Environment I couldn’t wait for physical servers and all the networking hassle so I used Oracle Virtual Box and created as many virtual machines as I required and setup a basic networking environment there. Once all the pings started to flow I build the above setup and tested calls – everything worked perfectly as expected.
My Dev Environment
Thats all for now, I hope this post be of some help for anyone interested in VoIP learning.
